


Photography is all about capturing light, and understanding how to control that light is essential for creating stunning images. Shutter speed, aperture, and ISO are the three core elements that control exposure in photography. These three settings work together, often referred to as the “exposure triangle,” and learning how to balance them will give you full control over your photos. This guide will break down each of these concepts and show you how they impact your images.
1. Shutter Speed: Controlling Motion and Light
Shutter speed refers to the length of time that the camera’s sensor is exposed to light. It’s one of the most critical settings for controlling motion in your photos. Shutter speed is measured in seconds or fractions of a second. For example, a shutter speed of 1/500 means the camera’s shutter is open for one five-hundredth of a second, while 1″ (one second) means the shutter stays open for one full second.
How Shutter Speed Affects Your Photos
- Motion Blur: A slower shutter speed (such as 1/30 or 1 second) allows more time for the sensor to gather light, which can result in motion blur. This is useful for capturing movement, like the smooth flow of water or the motion of a moving subject.
- Freezing Action: A fast shutter speed (such as 1/500 or 1/1000) allows less time for light to hit the sensor, which helps to freeze fast-moving objects. This is great for sports or wildlife photography where you want to capture fast motion without blur.
- Light Exposure: Slower shutter speeds let in more light, making your images brighter, while faster speeds let in less light, making your images darker.
Shutter Speed Tips
- For handheld shooting, it’s generally recommended to use a shutter speed that’s at least equal to your lens’s focal length. For example, if you’re using a 50mm lens, a shutter speed of 1/50 or faster is a good starting point.
- Use a tripod for longer shutter speeds to avoid camera shake, especially in low light conditions.
2. Aperture: Controlling Depth of Field
Aperture refers to the size of the opening in the lens through which light passes to reach the camera’s sensor. It is measured in f-stops (e.g., f/2.8, f/5.6, f/11), and it directly affects how much of your image is in focus. Aperture also plays a significant role in controlling the exposure of your image.
How Aperture Affects Your Photos
- Depth of Field: A wide aperture (small f-number like f/2.8) allows more light to pass through and creates a shallow depth of field, which means only a small portion of your image will be in focus, with the rest being blurred. This effect is popular in portrait photography, where the subject is sharp and the background is beautifully blurred (bokeh).
- Greater Depth of Field: A narrow aperture (higher f-number like f/16 or f/22) allows less light in but creates a larger depth of field, meaning more of your image will be in focus from front to back. This is useful for landscape photography where you want both the foreground and background to be sharp.
- Exposure: Aperture also affects how bright or dark your image is. A larger aperture (smaller f-number) lets in more light, making your image brighter, while a smaller aperture (larger f-number) reduces the amount of light, making your image darker.

Aperture Tips
- To create portraits with a blurred background (bokeh), use a wide aperture like f/2.8 or f/4.
- For landscapes where you want everything in focus, choose a smaller aperture like f/8 or f/16.
3. ISO: Controlling Sensitivity to Light
ISO refers to the camera sensor’s sensitivity to light. A lower ISO (e.g., 100 or 200) means the sensor is less sensitive to light, and a higher ISO (e.g., 1600 or 3200) means the sensor is more sensitive. Adjusting the ISO allows you to shoot in different lighting conditions without altering your shutter speed or aperture.
How ISO Affects Your Photos
- Low ISO: A low ISO value (e.g., 100) is ideal for bright conditions, such as outdoor photography during the day. It results in cleaner, sharper images with minimal noise (grain).
- High ISO: A higher ISO (e.g., 1600 or higher) is useful in low-light situations when you want to avoid long exposure times or wide apertures. However, higher ISO can introduce noise or grain into your images, which may reduce the overall quality.
- Exposure: ISO affects the brightness of your image without changing your aperture or shutter speed. Increasing ISO will make the image brighter, while decreasing ISO will make it darker.
ISO Tips
- Keep your ISO as low as possible to avoid noise, but feel free to increase it in low-light situations or when you need a faster shutter speed.
- Modern cameras are better at handling higher ISO settings, but noise may still become noticeable when shooting at ISO 3200 or higher.
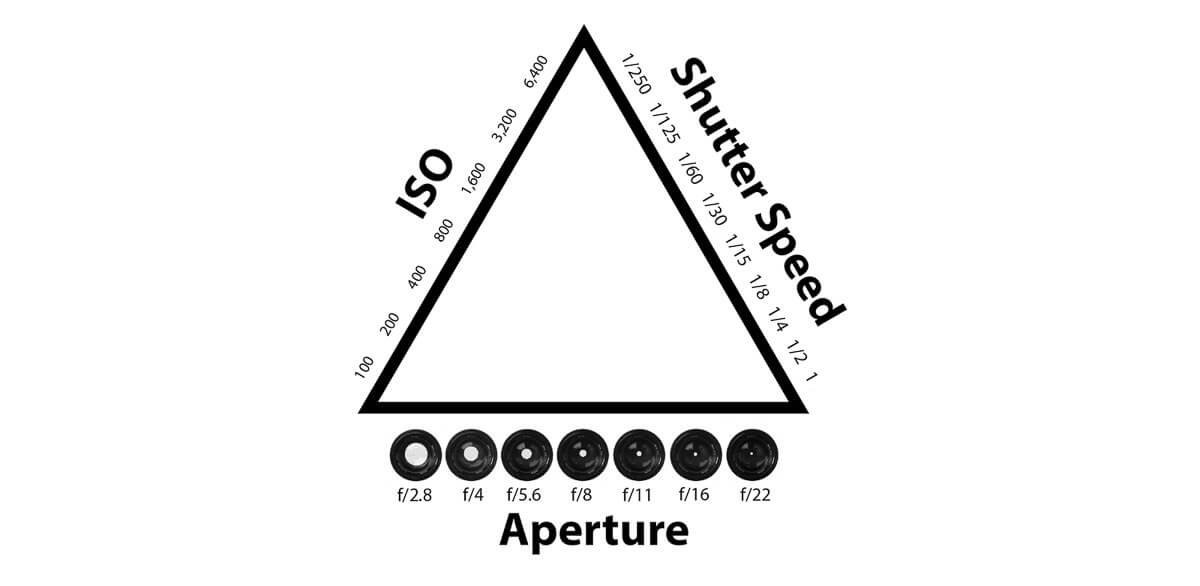
4. The Exposure Triangle: How Shutter Speed, Aperture, and ISO Work Together
The three elements—shutter speed, aperture, and ISO—work together to control the exposure of your image. The goal is to achieve a balanced exposure, where the image is neither too dark (underexposed) nor too bright (overexposed). Adjusting one element of the exposure triangle requires compensating with the others.
Example:
If you want to freeze motion with a fast shutter speed (like 1/1000), you may need to open up the aperture (use a smaller f-number like f/2.8) or increase the ISO (e.g., 800 or higher) to ensure your image isn’t too dark. If you’re shooting in a bright setting and want to achieve a blurry background, you might need to lower your ISO or use a faster shutter speed to prevent overexposure.
5. Putting It All Together: Practical Tips for Balancing Exposure
- Low Light Conditions: In low light, you may need to use a larger aperture (e.g., f/2.8), a slower shutter speed (e.g., 1/30), and a higher ISO (e.g., 800) to capture enough light.
- Action Shots: To freeze motion, you might want a fast shutter speed (e.g., 1/500) but compensate with a larger aperture (e.g., f/5.6) and a higher ISO (e.g., 1600) to maintain proper exposure.
- Landscape Photography: In daylight, use a smaller aperture (e.g., f/8), a moderate shutter speed (e.g., 1/125), and a low ISO (e.g., 100) to ensure both depth of field and clarity.
Conclusion
Mastering shutter speed, aperture, and ISO is key to becoming a proficient photographer. These three settings are interdependent and can be used creatively to achieve various effects, from freezing fast action to creating beautiful bokeh. Understanding the exposure triangle allows you to take full control of your images and adapt to different lighting conditions, ensuring that you can capture the world around you exactly as you envision it. Experimenting with these settings will help you discover your personal style and push the boundaries of your creativity in photography.


